
As the new year kicks off, I’m thrilled to embark on a unique journey. It’s a creative marathon: a year-long temperature quilt project! Temperature quilts are data quilts whose purpose is to capture the year’s temperatures at a glance. Here is an article from Moda’s blog back in 2022 where an overview and some examples are shared.
This idea appealed to me for lots of reasons:
- With the quiet season for markets upon us, other tasks like inventory management can take a back seat. It seems like just the right time to dig into a project like this.
- I tend to experience bursts of motivation in my creative practice. I like the idea of a project that forces me to engage with sewing a little bit each day.
- Temperature quilts are a great way to capture and bring attention to the changing weather patterns in our communities. Here is a CBC article about an Edmonton student back in 2022. She used a temperature quilt to show how temperatures in the month of February had changed over a period of many decades.
- I love the idea of doing something scrappy in a rainbow motif. The beautifully curated temperature quilts one sees on Instagram are aesthetic and pleasing, don’t get me wrong. I’m just going for something more chaotic that still tells a data story. I’m excited to see if my vision will match the final product!
To add a challenge to this experience (as if making a single, tiny quilt square per day for a year isn’t challenging enough) I’ve decided to use only what I have on hand in my sewing room. No fabric purchases, no special tools: this is a project for scraps only. Writing this down makes me a bit panicked as I think about my planned colour scheme being the whole rainbow. Will I have enough variety of fabric in each colour? Logically I know that this is a ridiculous question, but this is the kind of thing that usually has me rushing to the fabric store to overbuy. Not this January!
The Planning Phase
Since the adventure officially starts tomorrow (as I need today’s temperatures to get going), I took today to plan and prepare. Here’s a glimpse into my preparation process:
Quilt Layout and Design
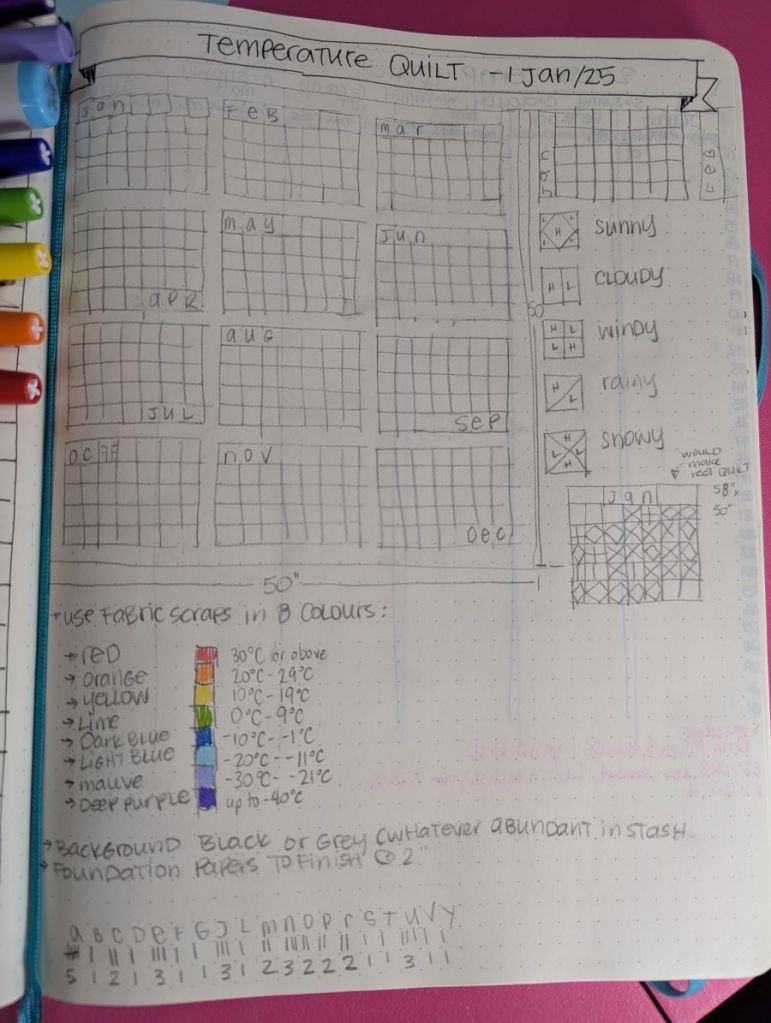
In my journal, I experimented with various layouts for the quilt. I considered size, placement, and where I would label the months. I really do want my calendar to look like a quilt. I’ve seen many of these quilts that one has to really study to notice the temperature aspect. These are cool, for sure. That’s not what I’m going for, though. A simple three-column by four-row quilt will emphasize the months of the year, making any given day easy to find. Will that be relevant as I enjoy this quilt in years to come? Who knows!
To add an extra layer of interest, I decided to incorporate weather events. Each block will have a simple pattern coded to show whether it was rainy, snowy, windy, cloudy, or sunny on that day. Of course, the weather today included periods that were overcast, sunny and snowy. So I’ll just have to decide each day, I guess.
Drafting Calendar Squares – Foundation Paper Pieces
For the calendar squares, I wanted to make foundation papers to make this process as easy as possible. I know myself well: if there are barriers to my doing this each day, I will simply not do it. Foundation paper piecing (FPP) is a quilting method where you sew your fabric directly on a paper (called the foundation paper). This is easier than traditional piecing (where each piece is measured carefully and then sewn together using a seam allowance). It is more accurate and allows for more intricate designs, and fussy cutting (where you centre a focal point on a piece of fabric). If you’re new to FPP, my favourite quilt vlogger Karen Brown has a great video on her YouTube channel about it.
To make the papers, I turned to Inkscape, a fantastic free vector editing program that I highly recommend! I drafted quilt square paper pieces easily enough. I just needed to create simple squares that lent themselves to the FPP method.
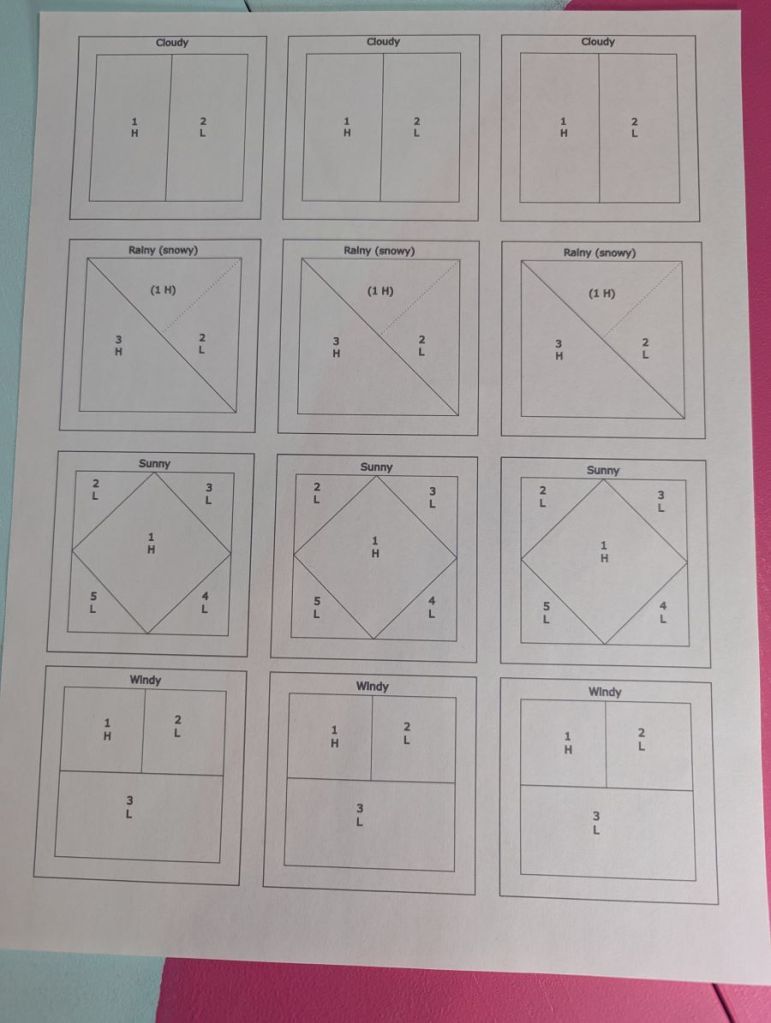
First I made two inch squares, then used the “outset” tool to create a quarter-inch seam allowance. I added the lines and numbers for FPP, and duplicated the columns to get multiples on one page. Eagle-eyed readers will notice that a couple of the designs changed from the journal to the FPP page. This is because, in FPP, the next seam has to either match or cover the previous ones. I also squeezed Rain and Snow onto the same square so that all the weather options fit on one sheet.
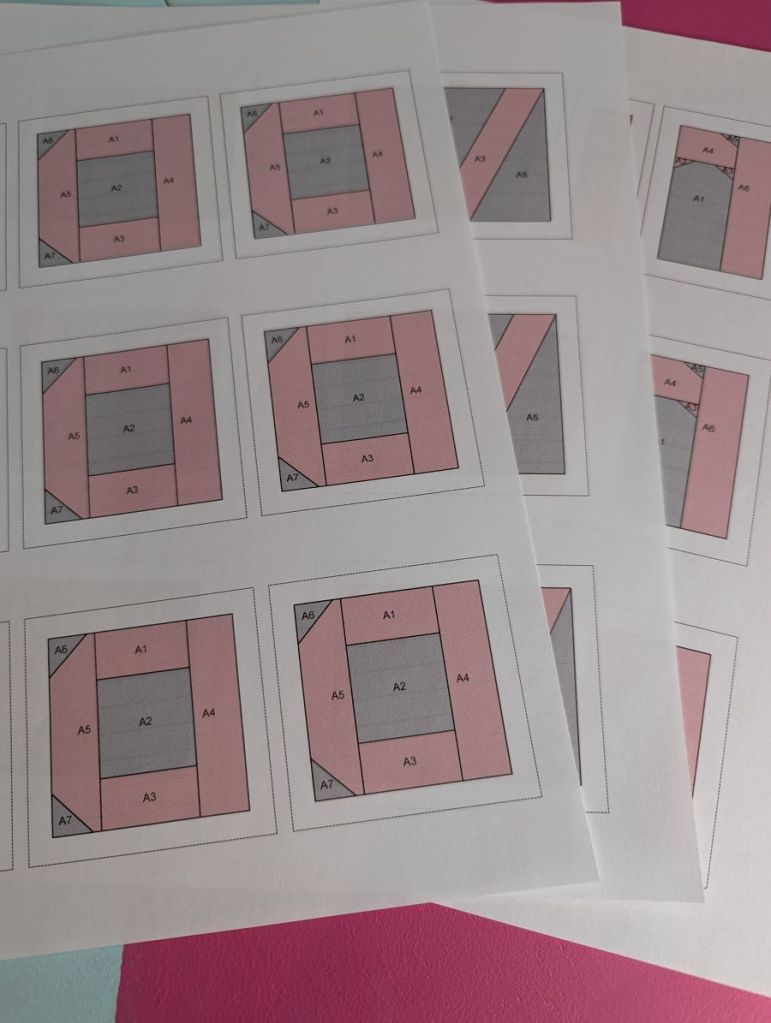
My design included month labels, so I needed an FPP alphabet for the first three letters of each month. This proved to be a challenge. My search started in one of my favourite places: the Etsy shop of an amazing paper-piecing quilter, Berene of Happy Sew Lucky. She has five fonts, all available for purchase and immediate download. I admit, I already own one! I was looking for something that finished at two inches, and I thought I might find it in the “HSL Tinies” collection. Unfortunately, the letters weren’t quite the right size to fit alongside my 2″ finished blocks. Alas!
Creating Custom Letters
Well, here I was on a holiday from work with nothing but time, so I embraced this learning opportunity. Back when I joined our local Modern Quilt Guild in 2020, I created paper pieced postcards for a holiday swap. I dusted off those skills and decided to create the letters I needed. Electric Quilter 8 (EQ8 – software for quilt design) was sitting on my computer from a past project, and I put it to work. I got bogged down in the details—obsessing over whether this was round enough, or that was the right thickness. I eventually recalled that the letters appearing on my screen were only going to be two inches tall in the quilt.
Using EQ8’s “export” function, I created FPP templates for the alphabet I’d drawn. With this step completed, I was off to the races!
Scrappy Supplies
One of the most exciting aspects of this project is my commitment to using only scrap fabrics from my stash. I won’t be buying any new supplies for this quilt. Instead, I’ll be breathing new life into leftover fabrics from earlier projects.
One of my favourite quilt bloggers, Bonnie K. Hunter of Quiltville.com, has absolutely stunning scrap quilt ideas. I made her “Straits of Mackinac” quilt this summer (photo below) and I learned a lot about scrap quilting. The very best part was how working with my scraps took me on a walk down memory lane. This quilt contained bits from every fabric project I’d ever done, making it very personal (and somewhat eclectic!). Keeping the colour scheme simple, though, made the pattern come through beautifully and made all the fabrics blend in. I remember hearing Jen Kingwell, Australian quilt designer, comment in an interview that, the more variety of scraps, the more they all match and blend. For example, can you see the weird eyeballs in the quilt below?
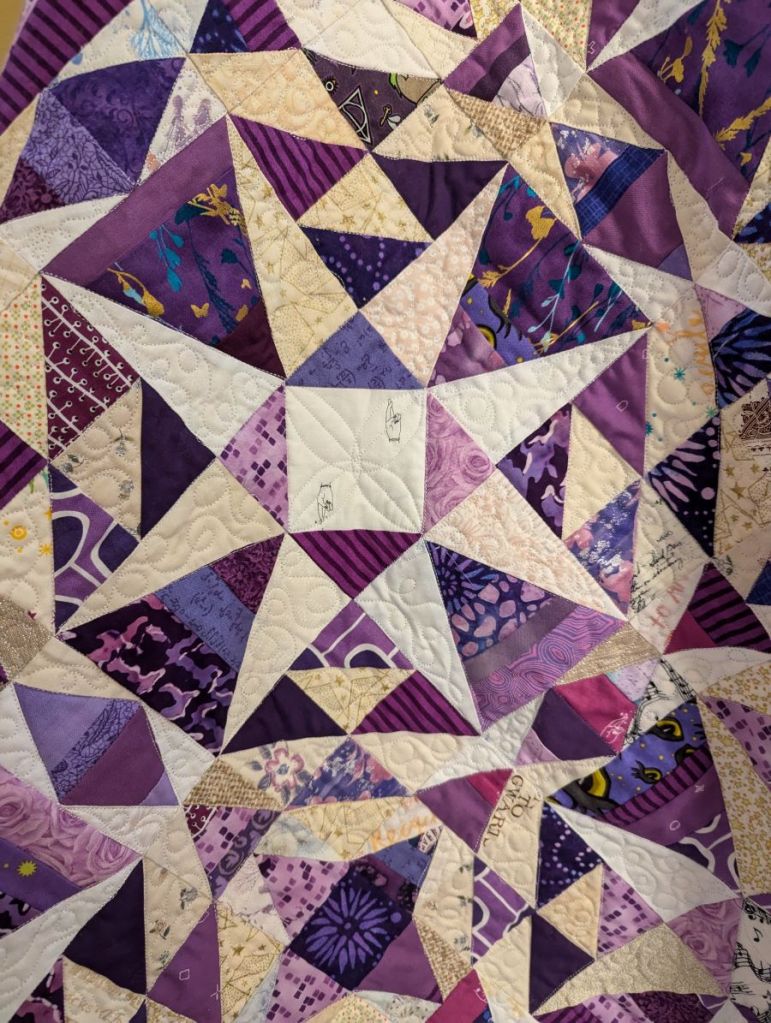
Both the scrap quilts mentioned above had very similar colour schemes – purple and white for the Straits of Mackinac and purple, blue and pink for the Wanderer’s Wife. It will be interesting to see if the rainbow colours pop in scraps (prints, solids, etc.) or whether it all gets a bit muddy.
I am so excited to make another scrap quilt. It makes the quilt more personal and sustainable. It also gives me the chance to use up some of my cherished fabric remnants.
Ready, Set, Quilt!
Now that I have all the parts ready, the next challenge is organization and follow-through—both areas I aim to improve. I’ll do my best to prepare the fabric and plan ahead to stay on track, even as life gets busy.
I’ve made list below, where I will link each of the monthly blog post updates as I write them.
- January
- February
- March
- April
- May
- June
- July
- August
- September
- October
- November
- December
Maybe you’ll check back in as I transform daily weather data into a vibrant, one-of-a-kind temperature quilt. Stay tuned for updates, progress photos, and maybe even a few tips and tricks along the way. Let’s make this a year to remember, one quilt block at a time!
See you next time,

Leave a comment